Thursday, January 31, 2013

Purple Stripes Tape Mani

Hey all!

Today I have a stripe tape mani for you! I'm really happy with this! I hope you guys enjoy it as much as I do! :)

I used:
OPI Nail Envy Original Matte
Maybelline Color Show Amethyst Ablaze (base - stripes)
NYC Matte Me Crazy
Maybelline Color Show Iced Queen


This is what I started out with. I wasn't sure what exactly I wanted to do with my ring finger. Do I make it the same as the others? Should I leave it? I decided to go with this...


I just moved the stripes up toward the top. A nice, subtle accent nail. I even did the same to my thumb.


I reallly enjoy this manicure. I started, of course, with my OPI, then I painted on two (one was probably fine) coats of Maybelline Color Show Amethyst Ablaze and applied one coat of NYC Matte Me Crazy. I cut strips of Scotch tape, applied them one at a time to each nail, and painted over with Maybelline Iced Queen. I didn't use a topcoat so I could preserve my matte stripes.


Yep, still lovin' it! I'm sure you'll see more tape manicures in the future. They're so simple and easy to do, as long as everything is dry and the tape isn't too strong that it takes the other layers of polish off. I've discovered that the hard way in the past!

Thanks for stopping by! :)

Wednesday, January 30, 2013

Flower Beauty Good Bud-Dy Glitter Gradient

Welcome back!

As promised, here is my first ever successful glitter gradient! I loved the turquoise from yesterday so much I decided to keep going and try a glitter gradient! I'm lovin' this! Here it is!

Glitters I used:
Pure Ice in Beware
Pure Ice in Once Again
Revlon Nail Art Duo Moon Candy in Milky Way (#2 - glitter end)


I reeeeeeeally like this manicure! So much sparkle, not to mention it's my first success when it come to glitter gradients! (Even if this is only the second time I've tried)


So pretty! But once again, remember the base color is a little darker in person. The tone of my skin and this color together make it hard for my camera to capture the correct colors, I guess!


That's all I've got for today! Until next time! :)


Tuesday, January 29, 2013

Flower Beauty Good Bud-Dy Swatch and Review

Heyyyyy!

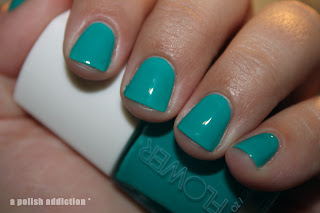
Today I have a swatch from Flower Beauty. I found this on display in WalMart for around $5. I love how the names of all the polishes in this line are flower related! This one is called Good Bud-Dy. Let's get to it!


This polish was super easy to work with, really smooth, and it a gorgeous color. Just keep in mind, that it is a little darker than pictured here and below. I had a tough time color correcting this one because my hands came out redder than usual. Either way, I really enjoy this polish!


This covered evenly and fully in just two coats. I just love this turquoise! I've never heard of this brand until now, and I'll definitely be stopping back to get more!


So pretty! Stop by tomorrow to see a glitter gradient using this polish!

Thanks for looking! :)

Monday, January 28, 2013

Del Sol Calypso Stamping

Hey there!

Today I have some stamping to show you. This is probably my third time stamping, ever. So, needless to say, it's far from perfect, and I tend to have a hard time with the white special polish. Maybe it dries quicker than the black? I'm not sure, but this is what I got!


I really like this pattern! I did get some dragging when applying my topcoat, though. This look was created with Del Sol polish in Calypso and Konad Special Polish in white. So naturally, because this was done using Del Sol color-changing nail polish, here's the sunlight version! 


Love love love this color! I wish this was the indoor color, so I could see it all day and not have to brave the frigid temperatures outside for a little bit of sunlight! (Or use my UV gel curing lamp)


At least my pointer and middle fingers came out pretty good! Just gotta get the hang of this!

Thanks for looking! :)


Saturday, January 26, 2013

Homemade Oak Nail Polish Rack

Hey!

I just wanted to show you guys my latest project! My dad and I made a nail polish rack! He was super excited that I showed some interest in wood-working and building, it kind of took his attention off the rack's not-so-manly purpose.


This is the setup in my room! I love that I can see all of the colors now. It took about a week to make, but it was so worth it. Now I can get going on more nail art!

Hope you enjoyed! :) Thanks for stopping by!

Thursday, January 24, 2013

Del Sol Color Changing Nail Polish - Swatches and Review

Hi again!

Today I have something I discovered while on a cruise to the Bahamas. In the duty free shop, as well as Nassau, Bahamas, there were these color changing nail polishes. They're made by Del Sol, and they change color when exposed to sunlight. They retail around $10.00 each, but you get 15mL, and they were on sale, buy three get one free, so I bought four.


In addition to nail polish, Del Sol has color changing, UV sensitive clothing and Disney color changing hair accessories for kids (or kids at heart)! Lots of cool fun-in-the-sun stuff!

~


First up is Pretty in Pink. Shown here is three coats, although I think two coats would have sufficed. It's a metallic-y white with a purplish-pink shimmer. Below is the polish after being exposed to a UV light.


There's not much of a color difference here. The UV light pretty much pulls forward the pink tones. For that reason, this is my least favorite polish. This is very easy to work with and smooth.

~


This is Candy Cane. This one is my second favorite out of the group. It's a solid white with a very slight pink tint that's more visible in person. This polish is the only one I had a little streaking problems with. Other than that, its great! Here I've shown four coats, although I think three would have done just as well. Below is the UV sensitive color.


This is such a pretty pink! I'm usually not fond of pink, but I do enjoy this one. Such a huge color difference here, which really makes me feel like this polish purchase was worth it!

~


Next is Sunkissed. It's a nude polish with a copper-y shimmer. This is very easy to apply, and I've shown three coats here, but once again I think two would have been good. I enjoy this polish, even if it is so sheer. 


The color difference here is really nice. The pink shows traces of that copper-y shimmer, and it's just so cute. 

~


Last, but not least, is Calypso. This is my absolute favorite. I love the bright pink and that pretty metallic finish. Like the others, this was easy to apply and really smooth. Here is three coats, although, again, two would have been fine.


This purple color is so pretty! I love this color even more than the indoor color! The color change is super drastic. Awesome.

Well, that's all I've got for today! Thanks for looking! :)

Wednesday, January 23, 2013

Paw Print Polka Dots

Hi again!

This afternoon, I have some paw print polka dots to share with you. Let's get to it!

I used:
2 coats OPI Nail Envy - Original Matte
3 coats Sally Hansen Complete Salon Manicure in Sheer Me Now
Sally Hansen Hard as Nails in Black Heart for the paws
Sally Hansen Nailgrowth Miracle in Wholesome Earth for the polka dots
2 coats Sally Hansen Dries Instantly


Sally Hanson Sheer Me Now is really streaky, so I didn't want to wear it alone. I had the idea of paw prints, but thought it'd be cool to add some different colored polka dots in there.


I used a large dotter for the pad of the paw, and dotted a few times to give the dot some irregularity, much like a dog's paw has. I used a medium dotter for the toes of the paws.


For the burgundy dotts, I used a meduim and small dotting tool to fill in the open spaces. I really like this simple design and I think the colors work well together.

Thanks for looking! :)

Saturday, January 19, 2013

OPI Nail Envy - Original Matte

Hey there!

Today was quite tragic. I broke two nails at work! So, I've trimmed my nails down a bit, but I actually kind of like them this way. I think they actually look cute! Plus, they're at guitar-playing length! Yay! Anyway, my nails are getting on the thin side, so I've just recently bought OPI Nail Envy, Original Formula in Matte.


The directions say to apply two coats and one coat every other day, or use as a base coat. So far, I've just applied the two coats. (I may do the whole every-other-day-thing, or I may get the urge to paint my nails!) It's a really smooth formula and pretty fast-drying. Totally loving the matte finish! I'm digging matte polishes more and more lately. 


As far as it actually strengthening, I haven't gotten that far. I'll have to do another post in the future with the results! I'm just hoping my dishwashing job doesn't hinder the possible results. We shall see!


Thanks for looking! :)


Friday, January 18, 2013

Cute Dotted Heart Nail Art!

Hi again!

Today I'm continuing with my grey theme. I love this grey color!

I used:
RCM Structure
RCM Brilliance
Sally Hansen X-treme Wear in Wet Cement
Rimmel 60 Seconds in Mintilicious
Sally Hansen Dries Instantly


I decided to add a turquoise heart using a medium sized dotting tool and Rimmel Mintilicious.


Pictured is two coats of Sally Hansen Wet Cement. This polish is really easy to work with and goes with just about any color! 


Loving this cute, easy, subtle design!

Thanks for looking! :)

Thursday, January 17, 2013

1st Attempt: Ikat Print

Hey!

I saw a tutorial this morning on Nails By Kayla Shevonne and decided to try it! This was my first time trying this technique, and I think it turned out pretty well!

I used:
Sally Hansen X-treme Wear in Wet Cement
A white striper
A black striper
Deb Nail Polish in Purple (?) no visible name
Sally Hansen Dries Instantly


My stripers are over 2 years old, so they were quite thick and sticky. (I should probably replace those soon!) I didn't get the most even shine as I had hoped I would.


I didn't think I'd even achieve this much when trying this design, so I'm really pleased, even though it isn't perfect! I definitely plan on trying this design again!

Thanks for looking! Have a great day! :)

Wednesday, January 16, 2013

Attempted Glitter Gradient

Hello again!

I really wanted to do a glitter gradient, but that didn't happen as I had envisioned. I was left with big chunky glitters half way up or down my nails. I thought this polish was going to be much thicker and glitter abundant but that wasn't the case at all.

I used:
RCM Structure
RCM Brilliance
Sally Hansen Hard as Nails in Black Heart
Wet 'N' Wild Fergie in Kaleidoscope Eyes
Sally Hansen Dries Instantly


I'm not really entirely sure how I feel about this one. I know next time I'll use a finer glitter for a gradient. Here, I basically placed the glitter flecks where I thought they looked at least presentable.


I first tried to paint one layer of this glitter, but no glitter came off the brush. Definitely too much clear or the glitter is just too heavy. Sorry, Fergie, but this isn't the best polish purchase I've ever made!

That's all for now! Thanks for reading! :)

Monday, January 14, 2013

Sally Hansen Smooth and Perfect in Sorbet Review and Swatch

Hey!

I started out thinking I was going to do something cute with stamping, but didn't get that far, and I didn't really even want to! Because my idea didn't turn out at all like I had hoped, I figured I'd review the base color I used.

I used:
Red Carpet Manicure Structure
Red Carpet Manicure Brilliance
Sally Hansen Smooth and Perfect in Sorbet
Sally Hansen Dries Instantly topcoat


I was not a fan of this at all. The color is pretty, but this polish was a nightmare to apply. The brush is really wide and round, so I found it kind of hard to work with. The formula was so thick and sticky... not at all smooth, and not at all perfect.


Pictured is 3 insanely thick, insanely annoying coats. I knew this was going to take forever to dry, so I used one coat of Dries Instantly by Sally Hansen to top it off.


Besides being so thick and sticky, the color is mostly even. So it's got that going for it, as far as pastels go.

Thanks for stopping by!

Sunday, January 13, 2013

Floral Nail Art Stamping

Hi!

Today I have what I call "Cement Blossom" for you! I have the next two days off, so my hands have some time to actually look good. Here we go!


This is what I started with. I used:
- Sally Hansen X-treme Wear in Wet Cement
- Sally Hansen Nailgrowth Miracle in Gentle Blossom
Again, I painted over clear gels and applied a gel topcoat when the look was completely dry.


But I decided to take it a step further and spice it up a bit. I used Konad Special Polish in White and Konad plate m73 on the accent nails.


I didn't get full stamp coverage on my ring finger on my left hand or my thumb on my right hand, but my ring finger on my right hand and the thumb on my left hand had full to adequate coverage. I'm not sure if I maybe wasn't using enough force to stamp or if the polish dried too quickly. Either way, I'm digging this look!


Thanks for reading! :)


Thursday, January 10, 2013

Welcome / Cheetah Print Nails!

Hey everyone!

I just decided to start a nail blog and share my obsession with all of you wonderful people!

Today, I'd like to show you a mani I did a couple days ago. I just recently invested in a Konad nail stamper, and I'm so glad I did.


The polishes I used were:
- Rimmel 60 Seconds: Caramel Cupcake (nude)
- Konad Special Polish: Black (the particular one I used has a gold shimmer to it)
- Sally Hansen HD: DVD (purple glitter)
- I stamped using the Konad m57 plate


I'm so proud of this! I didn't use a base or topcoat, exactly. I usually use Red Carpet Manicure gel polishes. I work as a dishwasher (unfortunately) so I need my nails to be extra strong and long-lasting. That's also why they're on the shorter side (also unfortunate). Here, I used one coat of RCM Structure with two coats of RCM Brilliance on top, which is essentially a gel topcoat. I then layered two coats of Rimmel Caramel Cupcake. After that was completely dry, I cured one more coat of RCM Brilliance. I then stamped on top of that, added the glitter using a dotting tool, and cured one more coat of RCM Brilliance after everything dried fully.

Side note: the glitter is pretty transparent, so you may have to dot twice. Also, these pictures were taken after three hours of washing dishes! RCM gels are pretty strong! Maybe I'll do a post about that in the future :)

Thanks for reading!